How to Create a Circus Tent Ceiling

Creating a circus tent ceiling mural is really rather easy. Now you can give your kids a fun, colorful room and make their room the envy of the neighborhood!
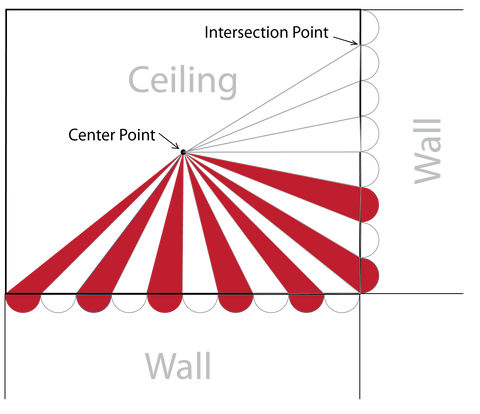
Step 1. On your ceiling draw a line or snap a chalk line from corner to corner to create your center point

Step 2. Take a 12" diameter paper plate and cut it in half to create a half circle for your scalloped edge. You can also trace a 12" diameter circle onto a piece of cardboard and cut that in half.

Step 3. Place the paper plate agains the top of the wall in the corner with the flat edge up against the ceiling. Trace around the bottom of the plate to create a scallop. Slide the plate to the right until the left side meets up with the right side of the previously traced scallop. Continue sliding and tracing until you have a scalloped edge all the way across the wall. Repeat on remaining walls.

Alternate Method: Tie one end of a piece of string to a nail. Tie the other end to a pencil making sure the distance between the two is 12". Place the pencil at the very top of the wall in the corner of the room. Place the nail to the right of the pencil up against ceiling and pull it taut giving you the 12" distance. Then, while holding the nail firmly in place draw the scallop with the pencil while keeping the string taut. Continue across the wall.

Step 4. Draw a pencil line from the intersection of the scallop to the center point on your ceiling. Continue all the way around the room. Then you can choose a couple of colors and paint every other stripe/scallop a different color. 

Murphey's Law - hopefully your walls are in 12" increments - such as 10' x 12' or 11' x 13'. If they are - you lucked out big time and will have a perfectly striped circus tent!
If your walls are something like 1'-6" or 12'-3" you will have to adjust the size of the scallops on each wall so you don't end up with a super skinny or super wide stripe. You can add a tiny bit more or lest in the corners of the room and then add "curtains" in the corners to camouflage the difference. You could add real curtains or you could use our Corner Curtains to keep the hand-painted wall mural effect going.

NOTE: If you would prefer different colors - that's easy!
There are only five colors in this mural. Three for the curtains and two for the bows. For the curtains you need a base color for the curtains, a lighter shade of that color for the highlights, and a darker shade for the shadows. For the bows you need a base color and a darker shade for the shadows. That's it!
